Spring Boot - Add a Servlet to an Application
本文共 5101 字,大约阅读时间需要 17 分钟。
文章目录
准备
新建 Spring Starter Project:
编辑 pom.xml 文件,引入 spring-boot-starter-web 等依赖:
4.0.0 org.springframework.boot spring-boot-starter-parent 2.3.3.RELEASE com.mk spring-boot-servlet 1.0.0 spring-boot-servlet 1.8 org.springframework.boot spring-boot-starter-web org.springframework.boot spring-boot-devtools runtime true org.springframework.boot spring-boot-configuration-processor true org.projectlombok lombok true org.springframework.boot spring-boot-maven-plugin org.springframework.boot spring-boot-configuration-processor org.projectlombok lombok
新建一个 Servlet 类:
package com.mk.servlet;import java.io.IOException;import java.io.PrintWriter;import javax.servlet.ServletException;import javax.servlet.http.HttpServlet;import javax.servlet.http.HttpServletRequest;import javax.servlet.http.HttpServletResponse;public class HelloServlet extends HttpServlet { private static final long serialVersionUID = 1L; public HelloServlet() { System.out.println("HelloServlet.HelloServlet()"); } @Override public void init() throws ServletException { System.out.println("HelloServlet.init()"); } @Override protected void doGet(HttpServletRequest request, HttpServletResponse response) throws ServletException, IOException { System.out.println("HelloServlet.doGet()"); PrintWriter writer = response.getWriter(); writer.write("Hello, " + request.getRemoteAddr()); writer.flush(); writer.close(); } @Override public void destroy() { System.out.println("HelloServlet.destroy()"); }} 新建一个 Servlet 配置类:
package com.mk.configuration;import org.springframework.boot.web.servlet.ServletComponentScan;import org.springframework.context.annotation.Configuration;@Configurationpublic class ServletComponentConfiguration { } 启动类:
package com.mk;import org.springframework.boot.SpringApplication;import org.springframework.boot.autoconfigure.SpringBootApplication;@SpringBootApplicationpublic class SpringBootServletApplication { public static void main(String[] args) { SpringApplication.run(SpringBootServletApplication.class, args); }} 通过使用 Spring Bean 添加 Servlet
编辑 ServletComponentConfiguration 配置类,注册 Servlet 组件(第 16 ~ 24 行):
package com.mk.configuration;import java.util.Arrays;import javax.servlet.Servlet;import org.springframework.boot.web.servlet.ServletRegistrationBean;import org.springframework.context.annotation.Bean;import org.springframework.context.annotation.Configuration;import com.mk.servlet.HelloServlet;@Configurationpublic class ServletComponentConfiguration { @Bean public ServletRegistrationBean servletRegistration() { ServletRegistrationBean registration = new ServletRegistrationBean<>(); registration.setServlet(new HelloServlet()); registration.setUrlMappings(Arrays.asList("/hello")); return registration; }} 启动应用,观察控制台输出:
HelloServlet.HelloServlet()
说明 Spring Boot 已经将 HelloServlet 添加到容器中。
访问 ,看到返回预期的内容,表示 Servlet 组件添加成功:
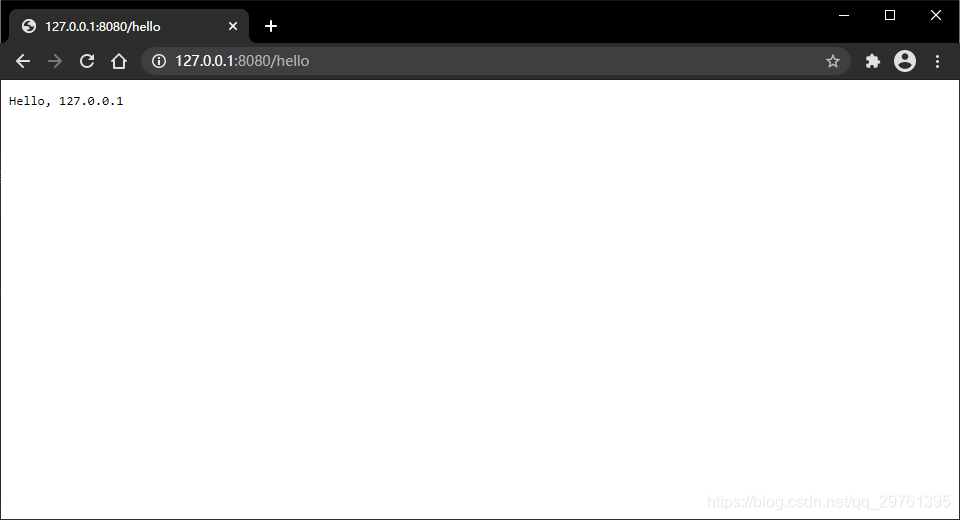
注意:第一次访问 的过程中,
HelloServlet.init()方法会被调用,此后不再被调用。
通过使用类路劲扫描添加 Servlet
编辑 HelloServlet 类:
- 使用
@WebServlet注解,设置urlPatterns属性指定 URL 映射路径(第 12 行)
package com.mk.servlet;import java.io.IOException;import java.io.PrintWriter;import javax.servlet.ServletException;import javax.servlet.annotation.WebServlet;import javax.servlet.http.HttpServlet;import javax.servlet.http.HttpServletRequest;import javax.servlet.http.HttpServletResponse;@WebServlet(urlPatterns = "/hello")public class HelloServlet extends HttpServlet { // ...略,保持不变} 编辑 ServletComponentConfiguration 配置类:
- 删除第 10 ~ 18 行
- 使用
@ServletComponentScan注解,设置basePackages属性指定 Servlet 组件的扫描路径(第 7 行)
package com.mk.configuration;import org.springframework.boot.web.servlet.ServletComponentScan;import org.springframework.context.annotation.Configuration;@Configuration@ServletComponentScan(basePackages = { "com.mk.servlet"})public class ServletComponentConfiguration { // @Bean// public ServletRegistrationBean servletRegistration() { // ServletRegistrationBean registration = new ServletRegistrationBean<>();// // registration.setServlet(new HelloServlet());// registration.setUrlMappings(Arrays.asList("/hello"));// // return registration;// }} 启动应用,访问 ,看到返回预期的内容,表示 Servlet 组件添加成功。
参考
转载地址:http://jhyq.baihongyu.com/
你可能感兴趣的文章
MySQL服务器安装(Linux)
查看>>
mysql服务器查询慢原因分析方法
查看>>
mysql服务无法启动的问题
查看>>
MySQL杂谈
查看>>
mysql权限
查看>>
mysql条件查询
查看>>
MySQL架构与SQL的执行流程_1
查看>>
MySQL架构与SQL的执行流程_2
查看>>
MySQL架构介绍
查看>>
MySQL架构优化
查看>>
MySQL查询优化:LIMIT 1避免全表扫描
查看>>
MySQL查询优化之索引
查看>>
mysql查询储存过程,函数,触发过程
查看>>
mysql查询总成绩的前3名学生信息
查看>>
mysql查询语句能否让一个字段不显示出来_天天写order by,你知道Mysql底层执行原理吗?
查看>>
MySQL死锁套路:一次诡异的批量插入死锁问题分析
查看>>
Mysql死锁问题Deadlock found when trying to get lock;try restarting transaction
查看>>
MySQL添加用户、删除用户与授权
查看>>
Mysql添加用户并授予只能查询权限
查看>>
MySQL灵魂16问,你能撑到第几问?
查看>>